
To measure brake pad thickness without taking everything apart, start by inspecting through the wheel openings using a flashlight and mirror to see the pads between spokes. Use feeler gauges or a thin ruler through caliper inspection ports or pad windows for precise measurements, comparing them to manufacturer specs. Watch for warning lights or noises that indicate wear. If you’d like a detailed guide to master this process, continue exploring the options available.
Key Takeaways
- Use an inspection mirror and flashlight between spokes to visually check brake pad thickness without wheel removal.
- Insert a feeler gauge or small ruler through caliper inspection ports or pad windows for direct thickness measurement.
- Employ brake lining thickness gauges to measure pad wear through accessible openings with minimal disassembly.
- Look for dashboard warning lights or unusual noises as indirect indicators of pad wear needing further inspection.
- Regularly compare visual clues and sensor signals to maintain brake health without fully disassembling the system.

VEVOR 6.5L Pneumatic/Manual Oil Extractor Pump, Fluid Extractor Pump for Automotive Fluids Vacuum Evacuation, Oil Change & Fluid Change Tool with Dipstick and Suction Hose
【Dual-Mode Fit all Situation】 Our fluid extractor pump adapts to your needs with pneumatic and manual operation modes....
As an affiliate, we earn on qualifying purchases.
Visual Inspection Through Wheel Openings

Visual inspection through wheel openings is a straightforward way to check brake pad thickness on vehicles with alloy wheels featuring open spokes. By looking between the spokes, you can often see the top of the brake pads and determine if they’re worn down. If the friction material appears less than about 1/4 inch (6 mm), it’s likely time to contemplate replacement. Look for wear indicator slots or grooves on the pads, which serve as visual cues for remaining life. Keep in mind, this method works best with open-spoked wheels; solid steel wheels or drum brakes limit visibility. Always make certain the vehicle is parked on a level surface, and brake components are cool to avoid burns or distorted views. Regular visual checks help maintain safe braking performance. Understanding how to perform these checks can also be supported by knowledge of brake system maintenance, which emphasizes the importance of timely inspections. Additionally, familiarizing yourself with visual inspection techniques can improve accuracy and safety during these evaluations. Incorporating a basic understanding of worn brake indicators can further assist in recognizing signs of impending brake failure. Being aware of brake pad wear patterns can also help identify uneven wear that may require professional attention.

FOUR UNCLES Fluid Extractor & Filling Pump for Easy Oil Change
LONGER TUBES: The fluid transfer pump includes two extension hoses that can be connected for a reach of...
As an affiliate, we earn on qualifying purchases.
Using a Flashlight and Inspection Mirror
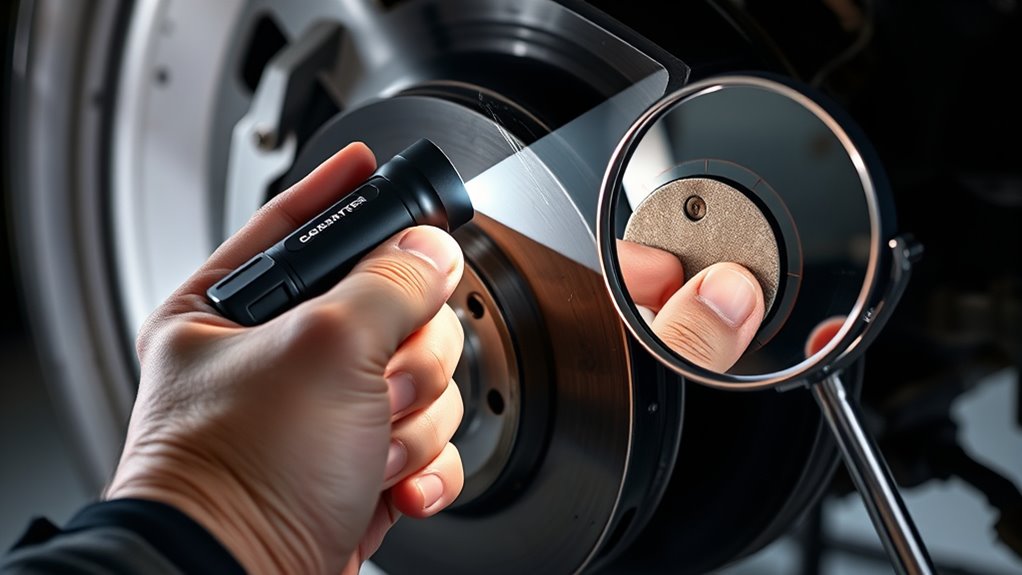
Using a flashlight and inspection mirror enhances your ability to assess brake pad thickness when direct sightlines are limited. Shine the flashlight between the spokes to improve contrast, making the pad backing and friction material easier to distinguish. Use an inspection mirror to view around caliper corners or behind backing plates where your line of sight is blocked. For better detail, a phone with a flashlight can capture images through wheel openings for closer inspection. Always cool brakes after driving to prevent burns. Additionally, understanding contrast ratio helps in evaluating how well you can distinguish different brake components under various lighting conditions. Being aware of visual contrast is crucial for accurate inspection when visibility is challenging, and familiarizing yourself with proper inspection techniques can further improve your assessment accuracy. Recognizing lighting conditions is essential, as they can significantly affect how well you can see the brake components during inspection. Using adjustable lighting tools or additional light sources can also help improve visibility in low-light situations.

DURATECH 500CC Fluid Extractor, Oil Extractor with Long Hose and Extension Tubes, Brake Fluid Extractor, Fluid Pump Automotive, Suction Pump for Lawn Mowers Cars Ships Golf Carts
Package Contents: The DURATECH fluid extractor includes 1 x 500cc fluid pump, 2 x 12" extension tubes with...
As an affiliate, we earn on qualifying purchases.
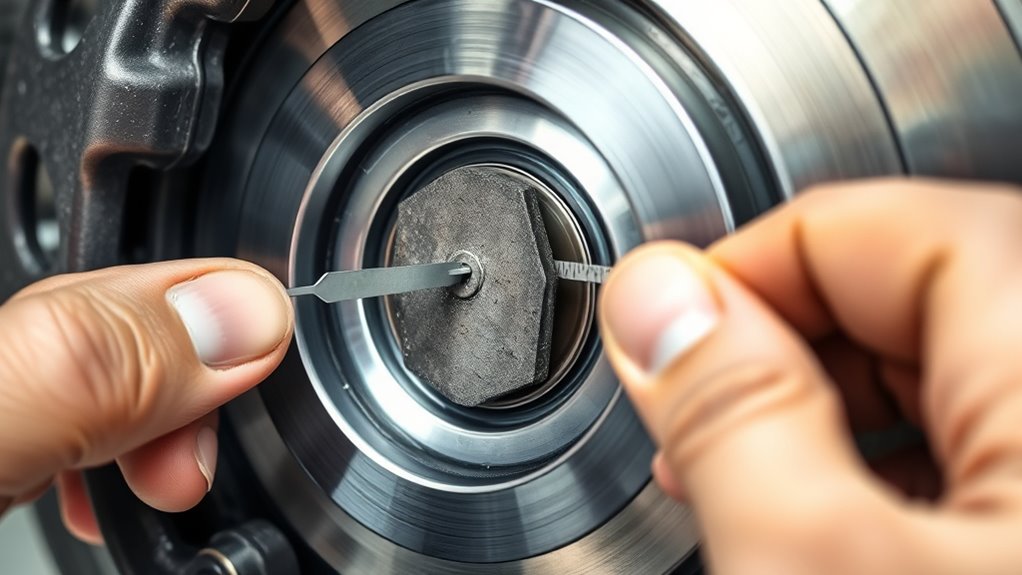
Employing Brake Lining Thickness Gauges and Feeler Tools
Have you considered employing brake lining thickness gauges and feeler tools for more accurate measurements? These tools allow you to assess pad thickness without removing the wheel. Using a dedicated brake pad gauge, you can slip blades between the rotor and backing plate to read remaining material. Some gauges are angled, fitting through spokes or gaps for quick in-place checks. Portable caliper-style gauges provide precise measurements but may need more clearance. To use them effectively, ensure the gauge seats against the pad backing, avoiding contact with the rotor. Always compare your readings to manufacturer specifications—typically around 3–4 mm minimum. This method offers a reliable way to monitor pad wear, especially when visual inspection isn’t practical or conclusive. Additionally, understanding the brake system helps in interpreting measurements and maintaining optimal braking performance. Being familiar with brake pad materials can also influence how you interpret wear and performance data. Moreover, knowing the safety guidelines ensures accurate and safe measurement practices. Regularly checking pad thickness with these tools can help prevent brake failure and promote vehicle safety. Proper use of measurement tools enhances accuracy and confidence in your assessments.
SWANLAKE 500cc Fluid Extractor & Fill Pump, Automotive Fluid Pump Extractor, Oil Change Pumps with 23'' Long Hose, 2PCS 12'' Extension Tubes, Suction Pumps for Lawn Mowers Cars
POWERFUL EXTRACTION - Delivers strong suction with its double-seal rubber rings, efficiently removing engine oil, transmission fluid, and...
As an affiliate, we earn on qualifying purchases.
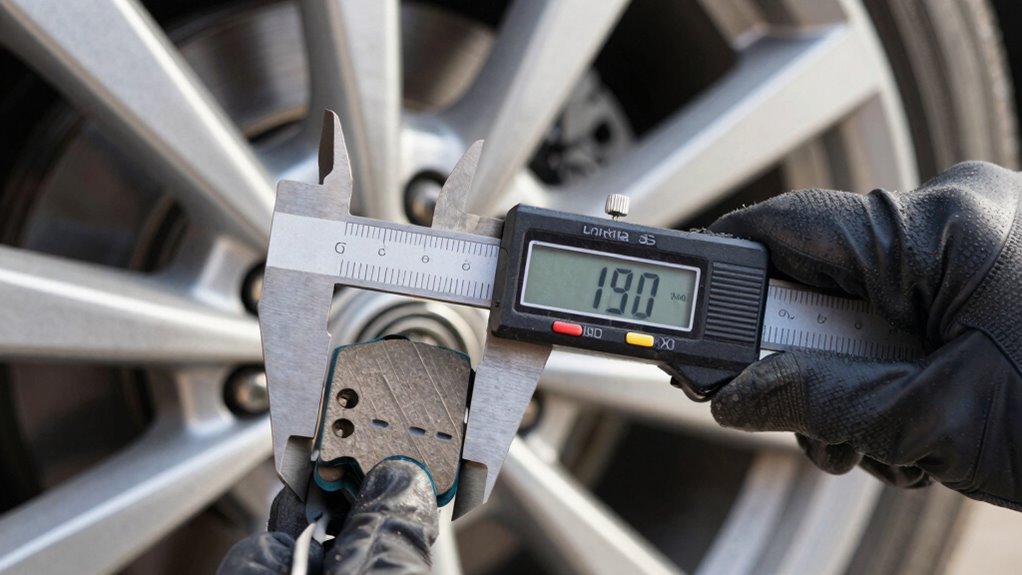
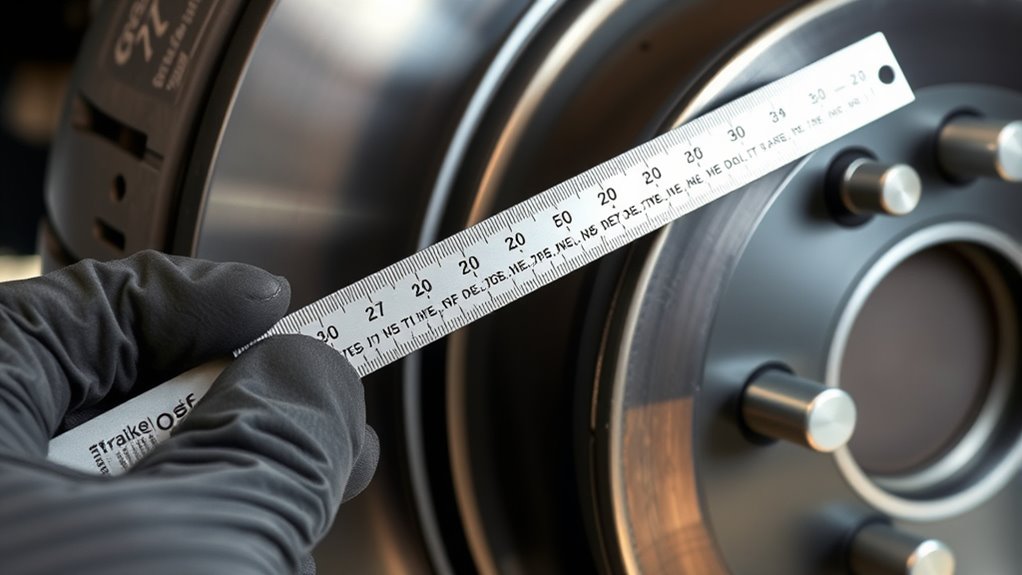
Measuring at the Caliper Inspection Port or Pad Window
Measuring brake pad thickness through the caliper inspection port or pad window offers a convenient way to assess wear without removing the wheel. You can visually evaluate the remaining friction material by using a small ruler or feeler gauge inserted through the opening. Compare the measurement to the manufacturer’s minimum thickness, typically around 3–4 mm. In some cases, the pad backing plate’s position relative to the rotor edge indicates wear. However, access can be limited by wheel design or hardware, making it impossible on certain vehicles. Using inspection techniques can help improve accuracy when evaluating brake pad wear in these situations. Additionally, understanding brake system components can aid in interpreting what the measurements reveal about overall brake health. Familiarity with wear indicators can also assist in quickly identifying when a pad needs replacement. Knowing the proper inspection procedures can further enhance the reliability of your assessment and prevent premature replacements.
Being aware of safety precautions during inspection is crucial to avoid injury or damage to brake components.
Recognizing Indirect Indicators and Onboard Diagnostic Alerts
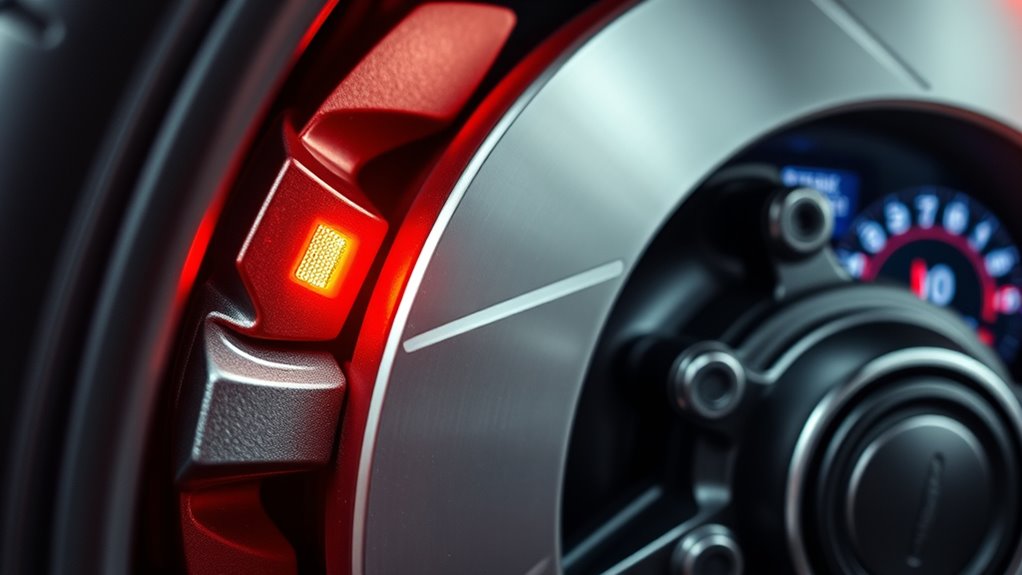
Recognizing indirect indicators and onboard diagnostic alerts is essential because they often signal brake pad wear before visual inspection reveals significant damage. Paying attention to these signs can save you time and prevent more costly repairs. A visual inspection of the brake pads can also help confirm their condition, especially if you notice any of these warning signs. 1. Dashboard warning lights for brake wear sensors alert you when pads reach a critical thickness. 2. Unusual noises like squealing or grinding during braking suggest pads are worn down. 3. Vibration or pulsing felt in the brake pedal indicates uneven pad wear or rotor contact. 4. ABS or traction control fault codes can point to degraded brake sensors or hardware issues, prompting further inspection. Additionally, understanding brake system diagnostics can help interpret sensor alerts and fault codes more effectively. Recognizing wave and wind effects on vehicle handling can also alert you to underlying mechanical issues that may relate to braking performance. Staying aware of sensor signals can help you catch issues early, before they compromise your safety. Moreover, keeping an eye on brake fluid levels and their condition can provide additional clues about the overall health of your brake system. These indicators should prompt you to check your brake system visually or with measurement tools. Relying solely on alerts isn’t enough; always verify the actual condition for safe braking performance.
Frequently Asked Questions
How Accurate Are In-Place Measurements Compared to Removing the Wheel?
In-place measurements are generally less accurate than removing the wheel because they rely on visual or gauge assessments that can be obscured or misread. You might miss uneven wear or inner pads, especially with solid wheels or complex hardware. However, tools like brake lining gauges or inspection windows provide reasonably reliable estimates, especially if you’re experienced. For precise results, removing the wheel and inspecting directly remains the best method.
Can I Reliably Check Pad Wear on All Vehicle Types?
You can’t reliably check pad wear on all vehicle types, as some designs hide pads behind solid wheels or complex calipers. Open-spoked alloy wheels make visual inspections easier, but solid steel wheels or drum brakes limit this method. Using gauges or inspection ports helps in many cases, yet for a definitive assessment—especially on newer or specialized vehicles—professional inspection is often necessary. Don’t rely solely on in-place checks; some hidden wear could be missed.
What Are the Signs of Uneven Brake Pad Wear?
You’ll notice uneven brake pad wear if you see one side of the pad thinner or more worn than the other, possibly causing vibrations or pulsing when braking. Squealing noises, a vibrating brake pedal, or asymmetric brake rotor surfaces are also signs. If your brake pedal feels inconsistent or if you notice uneven rotor wear, it’s a good idea to have a professional check for pad misalignment or hardware issues.
How Often Should I Perform a Visual Brake Inspection?
You should perform a visual brake inspection every 10,000 to 20,000 miles or at least once a year, depending on your driving habits. Regular checks help you catch uneven wear, worn pads, or damage early. If you notice squealing, vibration, or reduced braking performance, inspect sooner. Using a flashlight, mirror, or gauge can make these inspections easier, ensuring your brakes stay safe and effective.
Do Wear Sensors Replace the Need for Manual Measurement?
Wear sensors don’t substitute manual measurement but serve as helpful alerts. They trigger warning lights when pads reach a certain wear level, saving you from guesswork. However, sensors can fail or give false readings, so it’s still wise to physically check pad thickness regularly. Combining sensor alerts with visual inspections and measurements ensures you’re accurately monitoring brake health and maintaining safe stopping power.
Conclusion
Now that you know how to gauge brake pad thickness with a glance and gentle touch, you can confidently catch concerns before they cause calamity. With keen eyes, clever tools, and a bit of curiosity, you’ll keep your brakes’ health hearty and hassle-free. Remember, regular review and routine checks prevent problems from piling up, paving the way for safer stops and smoother drives. Stay sharp, stay safe, and keep your car’s critical components in check with these simple, slick strategies.