To achieve a firm brake pedal, you should follow the proper bleeding order, starting with the furthest wheel from the master cylinder. Typically, this is the right rear, then the left rear, followed by the right front, and finally the left front. This sequence helps remove air effectively and ensures even pressure. By sticking to this order and coordinating with an assistant, you’ll improve brake performance; keep going, and you’ll get all the details you need.
Key Takeaways
- Start bleeding from the wheel furthest from the master cylinder, typically the right rear, to remove the most air.
- Follow the sequence: right rear, left rear, right front, then left front for effective air removal.
- Keep the master cylinder fluid level between MIN and MAX to prevent air from entering the system.
- Bleed each wheel until no air bubbles are visible in the fluid for a firm pedal.
- Ensure the brake pedal feels firm and responds consistently before completing the process.

EWK 6.5L Pneumatic/Manual Oil Extractor, Oil Change Pump for Automotive Fluids Vacuum Evacuation, Fluid Extractor Pump Tool for DIY Mechanics
【Oil Change Made Simple】 Skip the shop and stay clean — extract oil right through the dipstick without...
As an affiliate, we earn on qualifying purchases.
Understanding the Importance of Proper Brake Bleeding

Proper brake bleeding is essential because it guarantees your braking system functions safely and reliably. When you bleed your brakes correctly, you remove air bubbles that can compromise braking performance. Air in the system compresses under pressure, leading to a spongy pedal and reduced stopping power. If not addressed, this can cause dangerous situations, especially in emergencies. Using the proper bleeding order ensures that old, contaminated fluid is replaced efficiently and cross-contamination is minimized. It also helps prevent uneven brake pad wear and maintains consistent pedal feel. Skipping or rushing this process risks brake failure or reduced effectiveness. Additionally, understanding color accuracy in your braking system can help identify issues with visual indicators or dashboard signals that alert you to potential problems. Recognizing brake fluid color changes can provide early warnings of contamination or deterioration, emphasizing the importance of proper maintenance. Monitoring brake fluid levels regularly can help catch issues before they affect braking performance. Regularly inspecting brake system components ensures that any deterioration or damage is addressed promptly, maintaining safety. Being aware of the effects of moisture and contaminants in brake fluid is also crucial for preserving brake system integrity. Consequently, understanding and executing proper brake bleeding is critical for your safety and your vehicle’s braking reliability. It’s a straightforward task that saves you from costly repairs and dangerous driving conditions.

FOUR UNCLES 200cc Fluid Extractor & Fill Pump for Automotive Use - Oil Syringe with a 23" Hose & Two 12" Extension Tubes for Easy Oil Change
LONGER TUBES: The fluid transfer pump includes two extension hoses that can be connected for a reach of...
As an affiliate, we earn on qualifying purchases.
Preparing Your Vehicle for Brake Fluid Replacement
Start by gathering all the essential tools, like a flare nut wrench, clear hose, waste container, and brake fluid. Next, lift your vehicle on jack stands and secure it on a level surface to guarantee safety. Additionally, double-check the industry standards for proper procedures to ensure effective brake bleeding. Proper adherence to manufacturer specifications can help prevent damage and ensure safety during the process. To ensure safe and reliable brake bleeding, consult a safety checklist to review proper procedures and precautions. Remember that understanding brake system components can also assist in troubleshooting any issues that arise during the process. Being familiar with European cloud standards can improve the effectiveness of your maintenance routine. Finally, check the brake fluid level in the master cylinder and fill it to the MAX mark before beginning the process.
Gather Essential Tools
Before you begin bleeding your brakes, gather all the essential tools you’ll need to guarantee a smooth process. Having everything ready minimizes delays and keeps the job efficient. You’ll need a flare nut wrench, clear hose, waste container, and brake fluid. Also, ensure you have safety glasses and gloves for protection. Organize your tools in a way that’s easy to access. Here’s a handy checklist:
| Tool | Purpose | Notes |
|---|---|---|
| Flare nut wrench | Loosening bleeder screws | Correct size for fittings |
| Clear hose | Catching fluid, air bubbles | Attach securely to bleed screw |
| Waste container | Collecting old fluid | Keep it nearby |
| Brake fluid | Refilling reservoir | Use fresh, correct type |
| Safety gear | Personal protection | Wear glasses and gloves |
Having these tools prepared ensures a straightforward, safe brake bleeding process.
Elevate and Secure Vehicle
To guarantee a safe and effective brake fluid replacement, you need to elevate and secure your vehicle properly. Start by parking on a level surface and engaging the parking brake. Then, follow these steps:
- Use a jack to lift the vehicle, placing it on sturdy jack stands rated for your car’s weight.
- Ensure the vehicle is stable and secure before working underneath or removing wheels.
- Remove all four wheels to access the brake calipers easily.
- Before beginning work, verify that the vehicle’s support system is stable using proper tools and techniques to prevent accidents. Additionally, confirming the vehicle’s stability and support is essential for safety during brake maintenance. Proper elevation and securing reduce risks and improve work efficiency, especially when working with vehicles that have heavy components or are lifted off the ground. Incorporating vehicle stabilization methods can further enhance safety during this process. Using proper vehicle support techniques helps maintain stability and prevents accidental shifts during repairs.
This process prevents the vehicle from shifting or falling, ensuring your safety throughout the brake bleeding procedure. Confirm that the car remains stationary and well-supported before proceeding with any brake system work. Proper elevation and securing reduce risks and improve work efficiency.
Check Brake Fluid Level
After securing your vehicle on a level surface and removing all four wheels, the next step is to check the brake fluid level in the master cylinder reservoir. Open the reservoir cap carefully, making sure you don’t spill fluid. Verify that the fluid is within the MIN and MAX marks; if it’s below the MAX, add the recommended brake fluid to bring it up. Use a clean funnel if needed to avoid contamination. Keep in mind, brake fluid absorbs moisture over time, so don’t overfill. Once topped off, replace the cap securely to prevent dirt or moisture from entering. Maintaining proper fluid levels ensures your braking system functions correctly and prepares your vehicle for the bleeding process. Accurate fluid levels help avoid air entering the lines during bleeding. Additionally, regularly checking the fluid condition can help identify potential issues early and maintain optimal brake performance. Being aware of brake fluid types and their compatibility is essential to prevent damage to your braking system components. Proper fluid level maintenance is a simple yet crucial step in ensuring safe and effective braking. Regularly inspecting the brake system components can also help spot leaks or wear before they become serious issues.

SEDY Fluid Extractor - 200cc Multi-Purpose Syringe, Oil Suction Pump, Manual Extraction and Filling Pump, Automotive Oil Syringe
EFFICIENCY BOOST - 200cc Multi-Purpose Syringe ensures efficient fluid pump actions, be it brake fluid, gear oil, or...
As an affiliate, we earn on qualifying purchases.
Gathering Essential Tools and Safety Gear

Gathering the right tools and safety gear is essential to guarantee a smooth and safe brake bleeding process. Without proper equipment, you risk delays or accidents. First, ensure you have a flare nut wrench to loosen bleeder valves precisely. Second, get a clear hose and a waste container to catch old brake fluid and monitor for bubbles. Third, gather brake fluid suitable for your vehicle and safety gear like gloves and safety glasses to protect against splashes. Additional tools like a jack, jack stands, and a lug wrench will help with wheel removal. Preparing everything beforehand keeps the process efficient and safe. Proper tool organization also plays a crucial role in maintaining a smooth workflow during brake bleeding. Ensuring all safety precautions are followed minimizes risks during the procedure. Additionally, understanding proper fluid handling techniques helps prevent contamination and spills that could compromise brake system integrity. Being familiar with brake system components can also help troubleshoot issues and ensure a successful bleed. Incorporating knowledge of vetted security zones can also be beneficial in protecting your workspace from unauthorized access during vehicle maintenance.

DURATECH 500CC Fluid Extractor, Oil Extractor with Long Hose and Extension Tubes, Brake Fluid Extractor, Fluid Pump Automotive, Suction Pump for Lawn Mowers Cars Ships Golf Carts
Package Contents: The DURATECH fluid extractor includes 1 x 500cc fluid pump, 2 x 12" extension tubes with...
As an affiliate, we earn on qualifying purchases.
The Correct Bleeding Sequence for Optimal Results

Following the correct bleeding sequence is vital to make certain your brake system functions properly and to prevent cross-contamination of old and new brake fluid. Start with the right rear wheel, the furthest from the master cylinder. Next, move to the left rear, then the right front, and finally the left front, closest to the master cylinder. This order helps push old fluid and air away from the master cylinder, reducing the risk of introducing air into the system. It guarantees even bleeding across all calipers and maintains proper hydraulic pressure. Sticking to this sequence is essential for achieving a firm pedal and consistent braking performance. Always double-check your work and keep the brake fluid reservoir topped off during the process. Proper sequence minimizes the need for repeated bleeding and ensures safe, reliable brakes.
How to Coordinate With an Assistant During the Process

Coordinating with an assistant during brake bleeding guarantees the process goes smoothly and efficiently. Clear communication and timing are vital for removing air effectively. Here are three key tips:
- Use clear commands: Signal when you want the pedal pressed (“applied”) and released (“release”). Consistent language avoids confusion.
- Synchronize movements: The assistant should press the pedal firmly several times and hold it down without releasing until you close the bleeder screw.
- Maintain steady pressure: The assistant must keep the pedal steady during fluid flow and alert you if there’s a change, ensuring air doesn’t re-enter the system.
Following these steps helps prevent mistakes, reducing the risk of spongy pedals or incomplete bleeding.
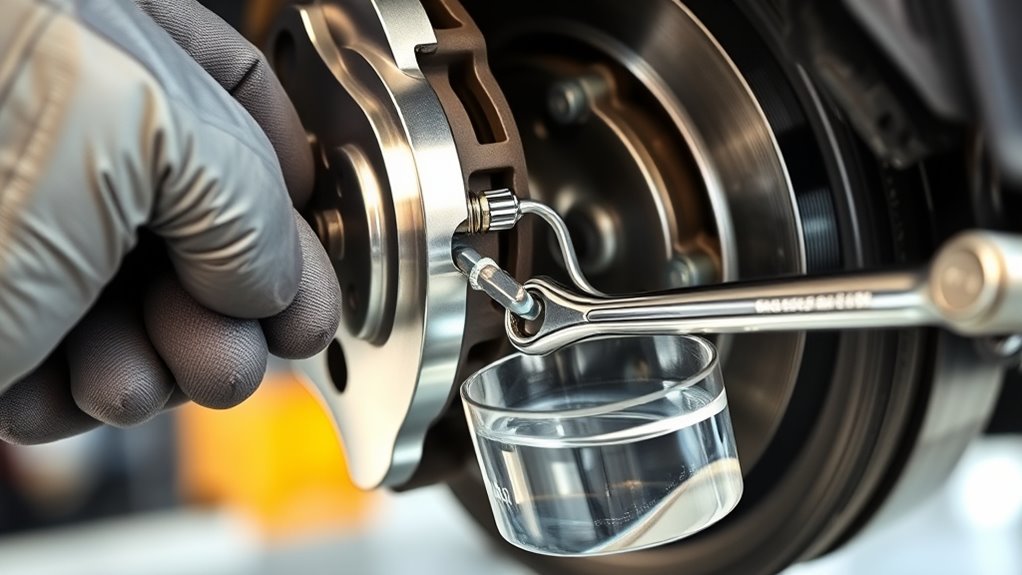
Step-by-Step Guide to Bleeding Each Wheel

To guarantee effective brake bleeding, you should start with the wheel farthest from the master cylinder—the right rear wheel. Begin by attaching the clear hose to the bleeder screw and opening it 1/4 to 1/2 turn. Have your assistant press the brake pedal firmly and hold it down. Loosen the screw to let fluid and air escape, then tighten it before your assistant releases the pedal. Repeat until no air bubbles appear in the fluid. Proceed to the other wheels in this order:
| Step | Action | Notes |
|---|---|---|
| 1 | Attach hose & open screw | Use proper tools, ensure a tight fit |
| 2 | Pedal press & hold | Confirm pedal firmness with assistant |
| 3 | Tighten screw & release | Prevent air re-entry |
Monitoring and Maintaining Brake Fluid Levels
You need to regularly check your brake fluid levels to guarantee safe operation. Always handle brake fluid carefully, using proper containers and avoiding contamination. Keeping an eye on fluid levels and handling it correctly helps maintain your braking system’s performance.
Regular Fluid Checks
Regularly checking your brake fluid levels is essential to guarantee your braking system stays reliable and safe. Keeping an eye on fluid levels prevents air from entering the system and ensures consistent braking performance. To do this effectively:
- Inspect the brake fluid reservoir, ensuring the fluid is between the MIN and MAX marks.
- Use a clean cloth to wipe away dirt around the cap before opening it.
- Check for any discoloration or debris in the fluid—dark, cloudy fluid indicates it’s time for a change.
If the fluid is low, top it off with the recommended brake fluid type, but never overfill. Regular checks help you catch issues early, maintaining excellent brake function and safety.
Proper Fluid Handling
Maintaining proper brake fluid levels is essential for your vehicle’s braking performance and safety. You should check the brake fluid reservoir regularly, especially before starting any bleeding procedure. Keep the fluid at or near the MAX line; low levels can introduce air into the system, impairing braking. Use high-quality brake fluid recommended by your vehicle manufacturer, and avoid mixing different types. When topping off, clean the reservoir cap and surrounding area with brake cleaner to prevent contamination. Never reuse old brake fluid, and always dispose of used fluid properly. During bleeding, ensure the fluid flows smoothly from the reservoir into the system, preventing air from entering. Consistent monitoring and careful handling keep your brake system functioning reliably and extend the lifespan of components.
Final Checks and Ensuring a Firm Brake Pedal
After completing the brake bleeding process, it’s essential to verify that the brake pedal feels firm and responsive. A proper pedal indicates that air is fully removed and fluid flows correctly. To confirm this:
- Pump the brake pedal several times to see if it feels solid without sponginess.
- Check the pedal travel—there should be minimal movement before resistance.
- Conduct a cautious road test, applying gradual pressure to ensure consistent braking power.
If the pedal feels soft or sinks under pressure, repeat bleeding at the affected wheel. Also, top off the master cylinder fluid as needed. These checks ensure your braking system is safe and ready for driving, providing a firm, reliable pedal every time.
Reinstalling Wheels and Proper Torque Procedures

Reinstalling the wheels correctly is essential for safety and peak performance. First, align each wheel with the hub and hand-tighten the lug nuts. Use a torque wrench set to your vehicle’s specifications, tightening the nuts in a star pattern to ensure even pressure. Begin with the inner nuts, then move diagonally outward, repeating until all are properly torqued. This pattern prevents warping and uneven tightening. Once torque is achieved, double-check each lug nut for proper tightness. Lower the vehicle carefully onto the ground, then give each lug nut a final tightening in the star pattern. Proper torque prevents wheel loosening, brake issues, and uneven tire wear. Always follow the manufacturer’s recommended torque settings for your specific vehicle.
Testing Your Brakes After Completing the Bleeding Process
Once you’ve finished bleeding your brakes, you should first check the pedal firmness to make it feels solid and responsive. Next, perform a brake response test by gently applying pressure and observing how the vehicle slows down smoothly. Finally, do a visual inspection for leaks or any signs of brake fluid issues before taking the car for a cautious road test.
Pedal Firmness Check
You should test your brake pedal for firmness immediately after completing the bleeding process to guarantee the system is properly bled and functioning correctly. This check confirms that the pedal feels firm and doesn’t sink under pressure, indicating no air remains in the system. To do this effectively:
- Pump the brake pedal several times, noting the resistance.
- Apply steady pressure with your foot and hold it for a few seconds.
- Release the pedal and ensure it returns to the resting position without feeling spongy or sinking.
A firm pedal should feel solid and consistent, with no softness or excessive travel. If the pedal feels spongy or sinks, repeat the bleeding process. Confirming pedal firmness helps ensure safe, reliable braking performance.
Brake Response Test
How can you be sure your brake system is working correctly after bleeding? You perform a brake response test to verify proper operation. First, press the brake pedal firmly and hold it. Then, observe the pedal feel—should be firm without sponginess. Next, slowly release and press the pedal again to ensure it responds consistently. If the pedal sinks or feels soft, repeat bleeding. Here’s a quick checklist:
| Step | Action |
|---|---|
| 1 | Firmly press and hold the brake pedal |
| 2 | Check for a firm, steady pedal |
| 3 | Release and press again for consistency |
This test confirms your brakes respond properly, guaranteeing safety before road testing.
Visual Inspection
After completing the bleeding process, performing a thorough visual inspection guarantees your brake system is functioning correctly. First, check all bleeder screws and surrounding areas for leaks or fluid seepage, which could indicate improper sealing. Second, inspect the brake hoses and lines for cracks, bulges, or damage that might compromise safety. Lastly, verify the fluid level in the master cylinder reservoir; it should be at the MAX line without overflowing. Ensure the brake calipers and wheel cylinders are dry and free of excess fluid or debris. Look for any signs of corrosion or damage on components. Confirm that all caps and protective covers are securely in place. This quick visual check helps catch issues early and ensures your brakes are ready for safe operation.
Frequently Asked Questions
How Often Should I Bleed My Brakes for Optimal Performance?
You should bleed your brakes whenever you notice a soft or spongy pedal, or if you’ve recently replaced brake components or fluid. Regularly, it’s good to perform a brake bleed every 2-3 years or as part of scheduled maintenance, especially if you’ve experienced brake issues or water contamination. Keeping the brake system free of air and old fluid guarantees peak performance and safety.
Can I Bleed Brakes Without a Helper?
Yes, you can bleed brakes without a helper, but it’s tricky. You’ll need a clear hose, a container, and a steady hand. Start by pumping the pedal, then loosen and tighten the bleeder screw quickly to trap air. Keep an eye on the fluid level and watch for bubbles. Patience and careful timing are key, but a helper makes the process smoother and safer.
What Signs Indicate I Need to Repeat the Bleeding Process?
You need to repeat the bleeding process if your brake pedal feels spongy, soft, or sinks toward the floor when pressed. Also, if you notice air bubbles in the fluid or if the pedal gradually loses firmness after driving, it’s a sign to bleed again. Make sure to top off the reservoir and check all bleeder screws for leaks before repeating to guarantee a proper, firm brake pedal.
Is It Necessary to Replace Brake Fluid Entirely or Just Top It Off?
You should replace the brake fluid entirely rather than just topping it off. Over time, brake fluid absorbs moisture, which can reduce braking performance and cause corrosion. Flushing and replacing all the fluid ensures you remove old, contaminated fluid, restore proper hydraulic pressure, and maintain safety. Topping off only adds fresh fluid but leaves behind the old, degraded fluid that can compromise your braking system’s effectiveness.
How Do I Know if My Brake Pedal Feels Firm Enough?
You’ll know your brake pedal feels firm enough when it doesn’t sink to the floor under pressure and maintains consistent resistance. During testing, apply steady pressure and observe if the pedal stays firm without feeling spongy or soft. After bleeding, the pedal should feel solid and responsive, indicating proper fluid pressure. If it still feels soft or sinks slowly, repeat the bleeding process until you achieve a firm, reliable pedal.
Conclusion
Mastering the art of brake bleeding isn’t just about safety—it’s about restoring confidence behind the wheel. When you follow the proper sequence and pay attention to details, you’re gently guiding your vehicle back to its best performance. With patience and a steady hand, you’ll find that smooth, firm pedal feeling again. Remember, every careful step you take is a step toward safer, more enjoyable drives.