
When routing your rear camera cable, avoid high-vibration areas like near the exhaust or suspension components, as these are the “rattle zones” that can cause noise, damage, or signal loss. Secure the cable along stable parts of the vehicle and use rubber grommets or padding to cushion vibrations. Proper placement helps make certain of durability and clear image quality. Keep these tips in mind to prevent issues, and you’ll find more helpful advice ahead.
Key Takeaways
- Avoid routing cables near exhaust systems or suspension components prone to high vibrations.
- Use rubber grommets or padding to cushion cables in vibration-prone areas.
- Secure cables along stable, non-moving vehicle parts to prevent movement and noise.
- Steer clear of high-vibration zones to prevent damage and rattling over time.
- Choose mounting and routing paths that minimize exposure to motion and vibration sources.
Routing the rear camera cable correctly is essential to guarantee a clear and reliable feed from your camera to the display. When you’re setting up your camera, you want to avoid the “rattle zone”—areas where loose cables can cause noise, interference, or even damage. Proper routing not only ensures a stable picture but also prolongs the lifespan of your wiring. If you’re considering wireless alternatives, keep in mind that they can eliminate some of the hassle of cable management, but they still require a clean setup to avoid signal interference. Whether you’re using wired or wireless options, paying attention to how you route your cables makes a significant difference.
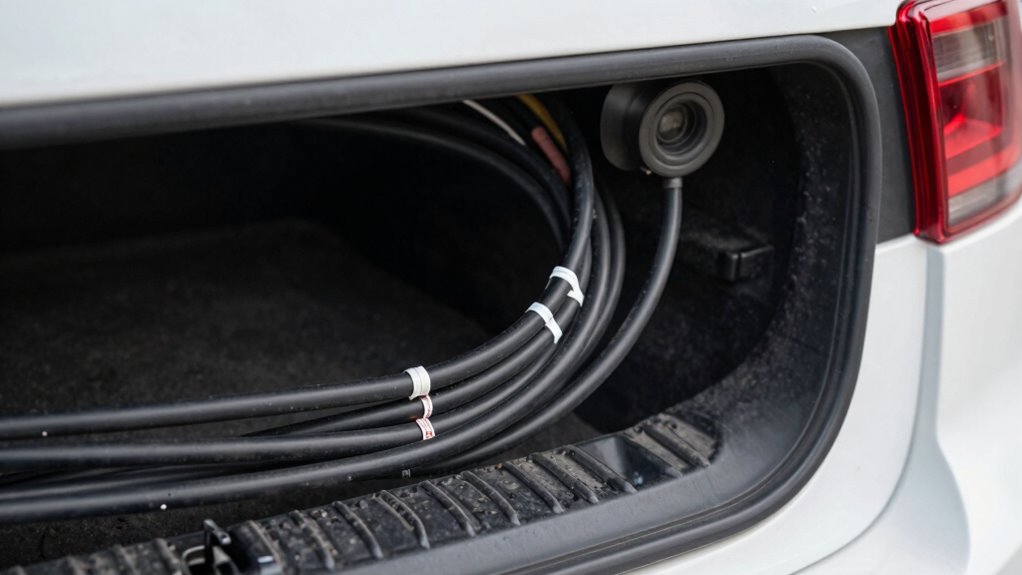
Your camera mounting techniques play a vital role in how you route the cable. Choose a mounting position that minimizes exposure to moving parts or areas prone to vibration. For instance, mounting your camera near the license plate or on the rear bumper usually offers a stable position. Once you’ve found the right spot, plan your cable route so it’s tucked away along existing vehicle panels or under trim pieces. This prevents the cable from hanging loosely or rubbing against the vehicle’s body, which can produce rattling sounds. When you run the cable, avoid sharp bends or pinched sections—these can cause internal damage over time. Use clips or zip ties to secure the cable firmly along the vehicle’s frame, but don’t overtighten, as that can damage the wire. Additionally, understanding the importance of cable routing helps prevent interference and damage during vehicle operation. Proper cable management also contributes to a cleaner, more professional appearance. Proper routing also involves minimizing exposure to vibration, which is critical for maintaining cable integrity. Ensuring the cable is routed through dedicated channels or clips can further protect it from unwanted movement or damage.
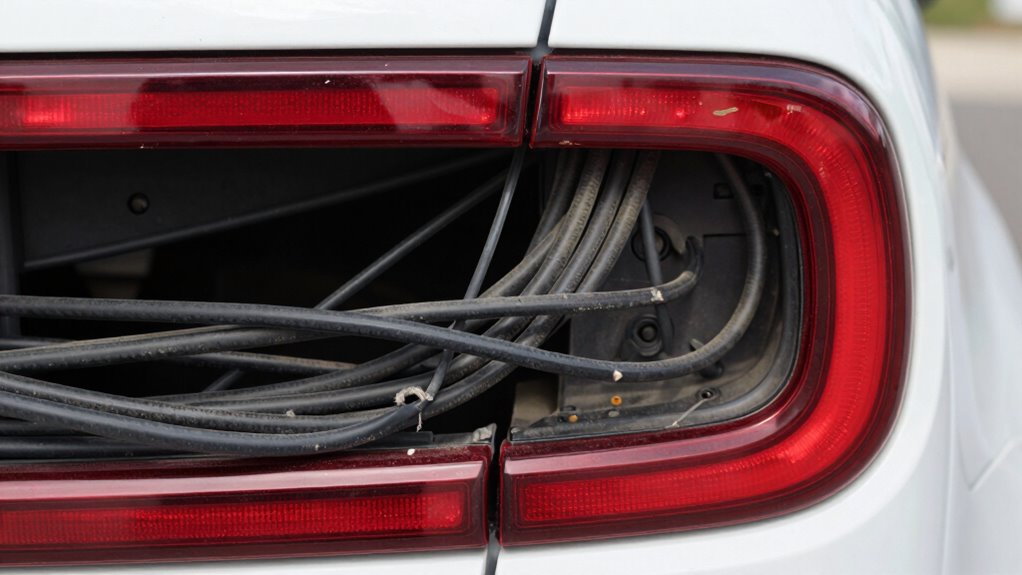
Another common mistake is routing the cable through the “rattle zone”—areas where vibrations are most intense, like near the exhaust or suspension components. Such zones can cause the cable to vibrate against the vehicle body, creating noise or even damaging the wiring. Instead, run the cable along stable, non-moving parts, and use rubber grommets or padding to cushion it from vibrations. If you opt for wireless alternatives, focus on securing the transmitter and receiver units firmly to prevent movement. This reduces the risk of signal interruptions or physical damage. Recognizing and avoiding vibration zones is crucial for maintaining a durable and noise-free setup. Properly routed cables not only ensure optimal performance but also help prevent cable damage over time.

Eboot 100 Pieces Adhesive Cable Wire Clips Strong Cord Clips Wire Holders Cable Cord Management Straps Clamps Tie Holder for the Wall, Under Desk, Car, Office and Home
- Package Includes: 100 adhesive cable clips
- Strong Adhesive: Firm grip and easy to remove
- Durable Material: Made of quality PC plastic
As an affiliate, we earn on qualifying purchases.
As an affiliate, we earn on qualifying purchases.
Frequently Asked Questions
How Do I Identify the “Rattle Zone” in My Vehicle?
You can identify the “rattle zone” in your vehicle by inspecting areas where the cable’s insulation looks worn or frayed, especially near tight bends or mounting points. Rattle zones often have limited routing flexibility, causing the cable to vibrate against metal or plastic parts. Avoid routing the cable through these areas to prevent noise and potential damage, ensuring a smoother, quieter camera operation.
What Tools Are Recommended for Cable Routing?
You need the right tools to keep your cable management neat and avoid the rattle zone. Use a pair of needle-nose pliers for guiding cables through tight spots, a wire loom for protection, and cable ties to secure everything firmly. A trim removal tool helps when routing cables behind panels without damage. Choosing the proper tools makes the job smoother and prevents unnecessary noise from loose cables.
Can Improper Routing Damage the Rear Camera?
Improper routing of your rear camera cable can definitely cause damage, especially if it exposes the cable to sharp edges or excessive movement. If you don’t use proper cable shielding and secure the cable away from areas prone to signal interference, the camera might experience poor image quality or signal loss. Avoid the “rattle zone,” and make sure your cable is neatly routed, shielded, and protected to prevent damage and maintain clear, reliable footage.
How Often Should I Inspect the Cable Connection?
You should inspect the cable connection regularly, ideally every few months, to guarantee proper cable maintenance and connection security. Frequent checks help identify loose or damaged cables early, preventing potential camera failure or damage. When inspecting, look for secure connections and signs of wear or fraying. Keeping the cables well-maintained and securely connected minimizes rattling and prolongs the camera’s lifespan, ensuring clear visibility and safety.
Is Professional Installation Necessary for Complex Routing?
You don’t need a professional for complex routing, but it’s wise to follow DIY tips and safety precautions. Carefully plan your cable path to avoid the “Rattle Zone,” where vibrations can loosen connections over time. Use appropriate tools, secure cables firmly, and keep them away from moving parts. If you’re unsure or uncomfortable, consult a professional to guarantee your rear camera functions reliably and safely.

Vrupin 32 Piece Closed Rubber Grommet Firewall Solid Closed Hole Plug Kit, Tower and Round Double Sided Rubber Hole Plugs for Wire Electrical Plumbing Systems.
- Variety of Sizes: 32 assorted sizes for versatile use
- High-Quality Material: Flexible, durable rubber with good electrical resistance
- Easy Installation: Quick and simple to install on one side
As an affiliate, we earn on qualifying purchases.
As an affiliate, we earn on qualifying purchases.
Conclusion
By carefully routing your rear camera cable away from the “rattle zone,” you can prevent unwanted noise and potential damage. Pay attention to the cable’s path, securing it properly and avoiding tight bends. Isn’t protecting your investment worth a little extra effort? Taking these simple steps guarantees your camera stays clear and functional, giving you peace of mind when reversing. After all, a smooth, rattling-free backup camera makes every drive safer and more convenient.

GOOACC 60Pcs Car Wire Loom Routing Clips Assortment – 6 Different Sizes Universal Wiring Harness Routing Clip Replacement Parts for Honda GM Mazda
- High-Quality Material: Made of durable nylon for strength and resilience
- Great Value Pack: Includes 60 clips in 5 sizes plus 10 cable ties
- Universal Fit: Compatible with Honda, GM, Mazda, Nissan, and more
As an affiliate, we earn on qualifying purchases.
As an affiliate, we earn on qualifying purchases.

Figpade 4 Sets Car Backup Camera Mount Kit with Screws,90° Adjustable Rear Camera Mount for 13mm Screw Mounting Holes,2 Types Rear Dash Cam Mounts Fit for Reverse Cameras/Rearview Cameras
- Adjustable Camera Mount: Rotates 90° for optimal view
- Two Mounting Options: Flexible or fixed installation
- Universal Compatibility: Fits most backup and dash cameras
As an affiliate, we earn on qualifying purchases.
As an affiliate, we earn on qualifying purchases.