
TL;DR
A closet can become a surprisingly effective recording space when you combine proper acoustic dampening, thoughtful placement, and ventilation. Foam alone isn’t enough; sealing gaps, using blankets, and managing heat are key to a quiet, clear setup.
Imagine turning that tiny closet into a professional-sounding vocal booth without breaking the bank. The secret isn’t just foam panels or fancy gear. It’s about smart placement, layered treatment, and controlling noise from every angle.
If you want crisp vocals, low echo, and a quiet workspace, this guide will show you how to leverage your closet’s space — and its limitations — to create a soundproof, absorber-rich environment that feels like a studio.
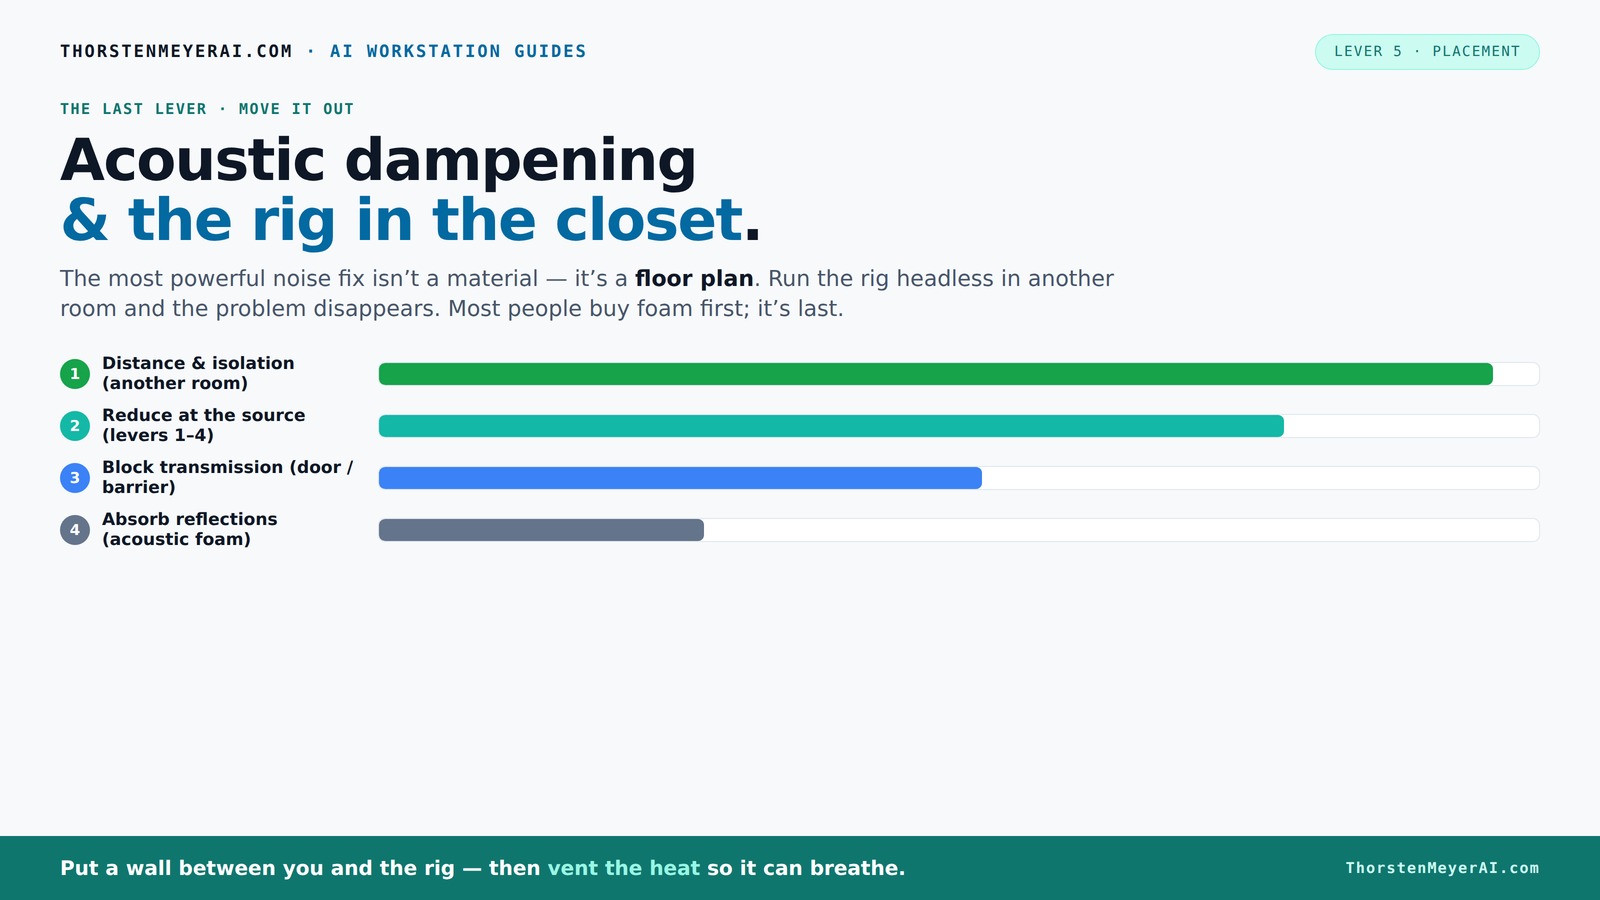
Acoustic dampening
& the rig in the closet.
The most powerful noise fix isn’t a material — it’s a floor plan. A rig you can’t hear because it’s in another room beats any amount of foam. Tap the approaches in Part 1 to see what actually works.
(another room)
(levers 1–4)
(door / barrier)
(acoustic foam)
Contain the noise, not the heat
Key Takeaways
- Layer your treatment: combine foam, blankets, and sealing for best sound reduction.
- Treat the door edges and gaps to prevent sound leaks, especially in small spaces.
- Position the mic carefully — away from reflective surfaces and angled toward your mouth.
- Use ventilation — active exhaust fans or vents — to keep your closet cool and prevent overheating.
- Remember: distance and isolation are your biggest allies. The quieter the rig is in another room, the better your recordings will sound.

Focusound 52 Pack Acoustic Foam Panels 1" x 12" x 12" Sound Proof Foam Panles Soundproofing Noise Cancelling Wedge Panels for Home Office Recoding Studio with 300PCS Double-Side Adhesive
Soundproofing - Acoustic foam panels triangular grooves structure for better noise absorption, helps to reduce and absorb unwanted...
As an affiliate, we earn on qualifying purchases.
As an affiliate, we earn on qualifying purchases.
Why a Closet Is Both a Blessing and a Curse for Recording
Closets are tiny, enclosed, and often lined with clothes or soft materials. That’s a blessing because it naturally dampens sound reflections. But it’s also a curse — small spaces can cause bass buildup and boxiness if not treated right.
Think of your closet as a mini sound chamber. When you record, sound waves bounce off hard surfaces, creating echo and harshness. But with the right setup, those reflections can be tamed, making your vocals crisp and clear.
For example, a voice-over artist in a walk-in closet layered with blankets and clothes can get studio-quality sound without expensive equipment. The key is knowing where to treat and how to place your gear.

Ultimate Portable Vocal Booth for Home Recording, Reduces Echo & Reverb
The Original & Best Portable Vocal Booth — Snap Studio created the category. Pop-up recording space for singers,...
As an affiliate, we earn on qualifying purchases.
As an affiliate, we earn on qualifying purchases.
Acoustic Dampening vs. Soundproofing — What’s the Difference?
Acoustic dampening and soundproofing aren’t the same — and mixing them up can waste time and money. Dampening reduces reflections inside your space, making sounds softer and less echoey. Soundproofing blocks sound from leaking in or out.
Think of dampening as putting a blanket over a speaker — it softens the sound within the room. Soundproofing is like building a wall that stops noise from escaping or entering.
In a closet, your goal is to dampen reflections with blankets and foam, while sealing gaps around the door prevents sound leaks. According to soundproofing experts, focusing on dampening inside the closet first gives better results than trying to fully soundproof a tiny space.

VEVOR Sound Dampening Blankets, Soundproof Curtains with 80 x 48 in, Soundproof Blanket with Grommets, Studio Grommeted Blanket, for Window, Door, Light Blocker, Music Recording, Black
Sound Absorption & Noise Reduction: Made with a polyester woven surface and recycled cotton filling, this 3-layer physical...
As an affiliate, we earn on qualifying purchases.
As an affiliate, we earn on qualifying purchases.
Where to Place Foam, Blankets, and Soft Materials for Best Results
Placement is everything. The first step: identify where the sound waves bounce most — usually behind or beside the mic. Place foam panels directly behind the mic or on the wall opposite it to absorb reflections.
Next, treat the door frame with blankets or foam to seal leaks, since sound leaks through gaps. Cover hard surfaces like shelves or desks with rugs or blankets to tame bounce and mechanical noise.
In a real-world scenario, a voice-over artist might position the mic facing away from the door, with foam on the wall behind and blankets around the door edges. This layered approach cuts down echo and prevents sound from escaping.
Understanding the importance of placement helps you target the most problematic reflections and leaks, which can significantly improve your recording quality. Poor placement can result in persistent echoes or sound leakage, undermining your entire setup. The tradeoff is that meticulous placement requires patience and experimentation, but the payoff is a clearer, more professional sound.

Ekkogo Studio Monitor Isolation Pads Premium Acoustic Foam Elevates Audio Ideal for 5 Inch Speakers Enhanced with Vibredux HD Foam for Superior Isolation
【ADVANCED VIBREDUX HD FOAM】: Experience the acoustic excellence of Vibredux HD foam with Ekkogo's Studio Monitor Isolation Pads....
As an affiliate, we earn on qualifying purchases.
As an affiliate, we earn on qualifying purchases.
Should You Treat Corners and Basses? Yes, and Here’s How
Corners are a notorious problem in small spaces — they trap low-frequency sound, creating boomy or muddy vocals. Adding bass traps or foam blocks in corners can tame this buildup.
In a closet, place thick, dense bass traps at the ceiling and floor corners where walls meet. This simple step prevents standing waves and gives your vocals more focus and clarity.
For example, a DIYer installed 4-inch thick bass traps in the closet corners and noticed a marked reduction in muddiness in their recordings. It’s a game-changer for small, reflective spaces.
Failing to treat corners often results in a 'boxy' or 'boomy' sound that can make vocals indistinct and fatiguing to listen to. The tradeoff here is that bass traps can be more expensive and require proper installation, but their impact on low-frequency clarity is well worth the investment.
Ventilation and Heat: Keeping Your Closet Cool and Quiet
Putting a hot, high-power machine in a closet is a recipe for overheating. The noise isn’t just from the machine — heat can kill your gear or cause it to throttle, making fans roar louder.
To avoid this, use active ventilation: a quiet exhaust fan pulling hot air out and drawing fresh air in. Even simple vents or a small duct can make a big difference. Learn more about cooling your AI rig.
For instance, a DIY engineer installed a small, quiet exhaust fan with a duct system in their closet, allowing heat to escape while keeping noise levels down. The result? Cooler, quieter operation and longer gear life.
Effective ventilation prevents heat-related performance issues and maintains a stable environment for your gear. Ignoring heat buildup can lead to hardware failure or increased fan noise, which compromises your recording quality. The tradeoff is that adding ventilation increases complexity and cost, but it’s essential for long-term reliability and consistent performance.
Learn more about cooling your AI rig.The 'Rig in the Closet' Setup — How to Make It Work Without Cooking Your Gear
Sealing a closet for noise reduction is smart — but only if you also manage heat. A fully sealed space traps heat, causing temperatures to creep up. This can throttle your GPU or CPU, reducing performance.
Ensure there's an airflow path — either passive vents or active fans. Use a thermostat-controlled exhaust fan to keep the temperature stable while dampening noise.
For example, a builder combined a small vent, a quiet fan, and a thermal switch to keep their AI rig cool and silent. It’s about balancing soundproofing with proper cooling.
Without proper airflow, your equipment risks overheating, which can lead to shutdowns or damage. Properly designed ventilation systems allow heat to escape while maintaining sound isolation, but they require careful planning and sometimes additional costs. The tradeoff is between a completely silent, sealed environment and a reliable, cool setup that protects your investment.
Check out case airflow options.Mic Placement and How to Avoid the 'Boxy' Sound
The way you position your mic can make or break your recording. Keep the mic facing away from reflective surfaces and close to your voice. Use a shock mount and pop filter to reduce vibrations and plosives.
In small closets, placing the mic 6-12 inches from your mouth and angled slightly downward helps avoid capturing reflected sound bouncing off walls.
One voice actor faced a boxy, hollow sound until they moved the mic away from the wall and added a foam panel behind it. The result was a clear, focused vocal with minimal echo.
Understanding the importance of mic placement involves recognizing how reflections and proximity affect sound quality. Proper placement minimizes room coloration and ensures your voice remains natural and intelligible. The tradeoff is that optimal placement may require trial and error, but it’s crucial for achieving professional-sounding recordings.
Common Mistakes to Avoid When Turning a Closet Into a Studio
Relying only on foam and ignoring the door gaps. Placing the mic too close to hard surfaces. Not sealing vents or gaps. Overlooking low-frequency buildup. And treating the room before deciding on mic placement.
For example, many new builders add foam panels but forget sealing the door edges, resulting in sound leaks. Others place the mic right against the wall, causing harsh reflections.
The best approach? Layer treatments, seal gaps thoroughly, and plan your mic placement first. This comprehensive strategy prevents common pitfalls like sound leaks, echo, or muddiness, which can severely degrade recording quality. The tradeoff is that it requires more effort upfront but yields a much more controlled and professional sound environment.
Budget vs. Professional: What’s Worth It?
Cheap DIY blankets and foam can do wonders — but for consistent, professional results, consider bass traps, custom panels, and engineered soundproof doors. A blanket booth is quick and cheap but might give a slightly 'boxy' tone.
On the other hand, investing in a dedicated acoustic panel setup or a soundproof door turns a closet into a near-studio environment. It’s all about your needs and budget.
For instance, a podcaster started with blankets, then upgraded to custom foam and bass traps, noticeably improving clarity and reducing noise bleed.
Frequently Asked Questions
What is the difference between acoustic dampening and soundproofing?
Acoustic dampening reduces echo and reflections inside a room, making sound softer and more controlled. Soundproofing blocks sound from leaking in or out, keeping noise contained. Both are important but serve different purposes.
Where should I place foam or blankets in a closet booth?
Place foam panels behind the mic and on the wall opposite it to absorb reflections. Seal gaps around the door with blankets or foam, and add blankets around hard surfaces like shelves or desks to reduce bounce.
Do I need to treat the corners?
Yes. Corners trap low-frequency sound, causing boominess. Installing bass traps or thick foam in the corners helps control this and results in clearer, more balanced vocals.
How thick should acoustic panels be for a closet?
Thicker panels are better for low frequencies. Typically, 2-inch panels work well for small spaces, while 4-inch panels provide deeper bass absorption in larger or more reflective closets.
Should I rely only on foam, or add blankets and rugs too?
Foam is good for high-frequency absorption, but combining it with blankets, rugs, and soft materials yields the best overall sound control. Multiple layers tackle reflections and leaks more effectively.
Conclusion
Turning a closet into a mini studio isn’t about perfection; it’s about smart, layered choices. Think of it as creating a cozy cave for your voice — sealed, dampened, and cooled just right.
With a little planning, your closet can deliver clear, professional vocals without the noise and distraction of a big room. It’s about working smarter, not harder — and making your small space work for you.