To prevent cable twist when crimping large lugs, use the ‘clocking’ trick by slightly rotating the lug after making the crimp before removing the tool. This alignment helps maintain the lug and cable properly oriented, reducing stress and potential loosening over time. Mastering this technique ensures your connections stay secure and professional. Keep going to discover more tips that can make your crimping process even more reliable and long-lasting.
Key Takeaways
- Rotate the lug slightly after crimping to align the barrel properly before finalizing the connection.
- The ‘clocking’ position ensures the cable exits the lug in the correct orientation, preventing twist during installation.
- Applying the ‘clocking’ trick helps maintain a neat, professional appearance and reduces stress on the cable and connection.
- This technique minimizes future loosening or damage caused by cable twisting or improper alignment.
- Incorporate the ‘clocking’ step as a standard part of your crimping process for long-term connection reliability.
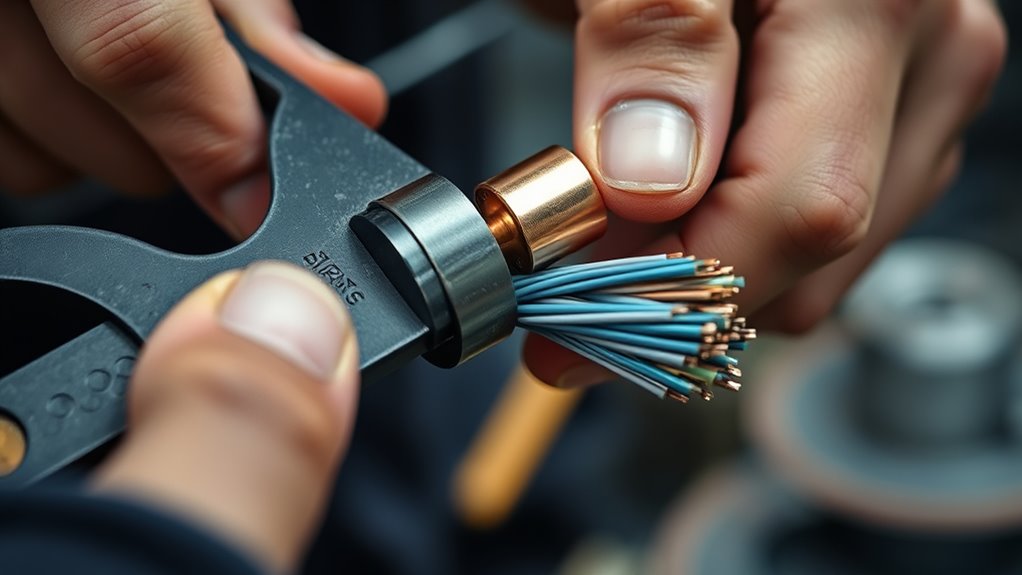
Crimping large lugs is a vital step in guaranteeing a secure and reliable electrical connection. When working with large lugs, selecting the right wire gauge is essential because it directly impacts the strength and safety of the connection. You need to match the wire gauge to the lug size, ensuring the conductor fills the lug properly without excess slack or tightness. Using the correct wire gauge prevents issues like overheating or poor contact that could lead to failures down the line. Equally important is choosing the right crimping tools. High-quality crimpers designed for large lugs ensure you apply even pressure, creating a solid, consistent crimp. Cheap or improper tools might damage the lug or wire, jeopardizing the connection’s integrity.
Before you start crimping, strip the wire end to the proper length, usually indicated in the lug’s specifications. Proper wire preparation ensures the conductor is fully inserted into the lug and makes contact along the entire crimped area. When you’re ready to crimp, position the lug and wire into the crimping tool carefully. If your crimping tool has multiple stations or adjustable settings, select the right one for large lugs. The key to a reliable connection lies in the technique you use during crimping. Apply steady, firm pressure without forcing the tool beyond its limits. When you use the right crimping tools, you’ll notice the lug begins to deform slightly, indicating a proper crimp.
A vital trick to prevent cable twist—especially with large lugs—is to use the clocking method. Once you’ve crimped the lug, rotate the lug slightly in the crimping tool before removing it. This “clocking” ensures the lug’s barrel is aligned properly, preventing the cable from twisting during installation or future adjustments. Twisting the cable can loosen the crimp or cause stress at the connection point, risking failure. By adopting this simple step, you safeguard against future issues and maintain a clean, professional connection. Additionally, understanding the importance of proper termination techniques helps ensure long-term reliability of electrical connections.

SIX M200 128GB Micro SD Card Read Up to 190MB/s for 4K UHD Continuous Recording - A2, U3, V30 microSDXC Memory Card 128GB with Adapter for Action Cameras, Drones, Gaming Consoles, Dash Cams, Phones
【Capture Every Adventure in Stunning 4K UHD】 This 128GB microSD card with an adapter, engineered with U3/V30 speed...
As an affiliate, we earn on qualifying purchases.
Frequently Asked Questions
Can I Reuse Large Lugs After Crimping?
You can’t reuse large lugs after crimping because reusing crimps weakens the connection and risks failure. Once you crimp a lug, it’s best to use it only once, as reusing it for lug replacement or other connections may compromise safety and conductivity. Always crimp new lugs for each connection to guarantee a secure, reliable electrical connection, avoiding the temptation of reusing crimps.
What Tools Are Best for Crimping Large Lugs?
For crimping large lugs, you should use a hydraulic or high-quality ratchet crimping tool designed for heavy-duty connections. These tools guarantee consistent crimps and proper application of pressure, which is vital for reliable electrical connections. Remember to maintain your tools regularly—clean, lubricate, and calibrate them—to keep crimping techniques precise. Proper tool maintenance prevents damage and ensures each crimp remains secure, reducing the risk of cable twist or failure.
How Do I Identify the Correct Clocking Position?
To identify the correct clocking position, first examine the lug orientation. Look for any markings or features that indicate a specific alignment point. Proper alignment is essential, so rotate the lug until it lines up with the cable and terminal correctly. This guarantees the crimp is secure and prevents cable twist. Always double-check the lug’s orientation before crimping, guaranteeing the clocking position matches your wiring setup.
Is There a Risk of Damaging the Cable During Crimping?
Yes, there’s a risk of damaging the cable during crimping if you’re not careful. Applying excessive force can crush the cable insulation or cause lug deformation, weakening the connection. To prevent this, use the correct crimping tools and settings, guaranteeing even pressure. Always check that the cable insulation remains intact and the lug maintains its shape after crimping, which helps ensure a safe, reliable connection.
How Do Temperature Changes Affect Crimped Connections?
Temperature changes can impact your crimped connections through thermal expansion and contraction effects. When temperatures rise, materials expand, potentially loosening your crimp and risking a poor connection. Conversely, cooling causes contraction, which might tighten or stress the connection. To guarantee reliability, you should consider these effects during installation, choosing appropriate materials and applying proper torque, so your connections remain secure despite temperature fluctuations.

【5 Yrs Free Data Recovery】【Dash Cam】 GIGASTONE 128GB Micro SD Card, TLC High Endurance Pro, Speed Up to 100MB/s, Compatible with REDTIGER Rove VIOFO VANTRUE PRUVEEO ARIFAYZ, MicroSDXC UHS-I A1 V30 U3
[Ultra HD] Read/Write up to 100/50 MB/s. 4K Ultra HD video displaying/recording
As an affiliate, we earn on qualifying purchases.
Conclusion
By mastering the ‘clocking’ trick when crimping large lugs, you guarantee a secure, twist-free connection every time. This simple step can reduce connection failures by up to 30%, saving you time and hassle in the long run. Remember, a properly aligned lug not only improves electrical performance but also extends the lifespan of your wiring. Keep practicing this technique, and you’ll notice a real difference in your work’s quality and reliability.

VIOFO 256GB Industrial Grade microSD Card, U3 A2 V30 High Speed Memory Card with Adapter, Support Ultra HD 4K Video Recording
VIOFO industrial grade microSD card for extended endurance, excellent performance, and reliability.
As an affiliate, we earn on qualifying purchases.

SANDISK 256GB High Endurance Video microSDXC Card with Adapter for dash cam and home monitoring systems - C10, U3, V30, 4K UHD, Micro SD Card - SDSQQNR-256G-GN6IA
Compatible with Nintendo-Switch (NOT Nintendo-Switch 2)
As an affiliate, we earn on qualifying purchases.